Leveraging SQL Server Profiler to troubleshoot 18456 Events

Many times I am brought in to assist in troubleshooting strange things that the client can’t identify easily on their own. In this particular occasion I was assisting in supporting a SharePoint solution and SQL Server kept generating the following 18456 event: “Login failed for user ‘NT AUTHORITY\NETWORK SERVICE’. Reason: Token-based server access validation failed with an infrastructure error. Check for previous errors. [CLIENT: <local machine>]”  every minute in the event log. The client was not sure why this was occurring and thought it may have been from an outage they had recently.

Event 18456 - Login failed for user\

A quick web search of the event showed people who had problems with applications accessing a database, but none with this specific account. That is because this is a generic message showing that some account is accessing some database from some computer and doesn’t have the appropriate permissions to do so. Some of that information is provided, however it doesn’t tell us why it is happening. So how do we get more information so that we can suggest the correct path to resolve it?

On the surface, my first impression was that a service was trying to access a database within SQL Server running as the Network Service, and was not permitted to access it. I gathered this from the fact the login was listed as ‘NT AUTHORITY\NETWORK SERVICE’ and the client was defined as local machine, CLIENT: <local machine>. Going with my first thoughts, I opened the Services console and sorted by login to determine the services running as Network Service.

image

This directed me to what I was pretty sure the problem was. If you look, there are two services related to SQL that were configured to run as Network Service. In addition, the client had all of the other SQL services configured to run with a defined service account, so these were anomalies to not also have been configured in the same manner. While confident this was most likely the source of the event generation, I needed to be sure.

SQL Server Profiler to the rescue!

This is where SQL Server Profiler comes in handy. This is a great tool to give you incite into your SQL environment and what is happening on a transactional basis. You can use it to trace events occurring in SQL to find stored procedures that are having problems, or long running queries, or any number of other problems that you just aren’t sure and need additional view of. In this case, we are looking for failed login attempts.

For this troubleshooting session, I knew that the logged event was only once every minute. This meant that if I configured the trace correctly, I would not be scrolling through a lot of event instances looking for my event. As well, I would not need to capture a lot of data, so outputting the profiler to a database or file wasn’t necessary.

Getting Started: Setting up the Trace.

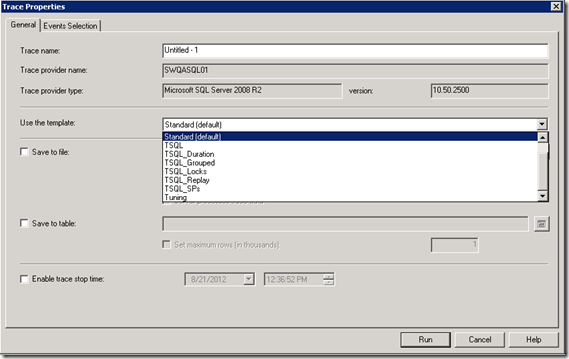
imageTo get started, open the Start Menu and navigate to Microsoft SQL Server 2008 R2 > Performance Tools > SQL Server Profiler (also available from SQL Server Management Studio under the Tools tab). When you first launch SQL Server Profiler, it will prompt you for the trace properties. the first tab (General) defines the initial properties of the trace. The section ‘Use the Template’ is of most interest of us in this troubleshooting. This defines the most probable list of counters and columns that we want to start with for capturing information in the trace. This is because  the actual amount of information we can choose from is vast and can be overwhelming if this is your first look into tracing or if you are not a seasoned SQL admin. The additional fields for saving the output to a file/database and trace stop time are not relevant to our isolated troubleshooting. However they can be handy when you are trying to find an intermittent problem and want to run a trace for a long time or have a lot of events you are capturing. Again, not relevant in this particular instance.

SQL Server Profiler trace properties

For this troubleshooting let’s start with the Standard (default) template. Once selected, go to the Events Selection tab. This will show you all the events and columns that are selected to be captured and displayed in the trace.

image

As you can see, we are capturing a lot of additional data that is probably not relevant to what we are looking for. Namely, we were looking for something associated with logins (remember: “Login failed for user ‘NT AUTHORITY\NETWORK SERVICE’…). With that, I removed the events that I didn’t think would be required. I also unchecked columns of data that I didn’t think would help me once I found the appropriate event (I don’t care about which CPU is being used, or the duration, etc…)

image

Now I could run this trace as-is, and you can even do so just to see the amount of data being captured and the information in the trace session. However, this will not give me the event I was looking for. This is because my specific event is a failed login. This trace will only show me successful logins and logoffs. So how do we get the data I really want?

Finding Audit Login Failed

First, I select Show all events to show all the possible events that I can trace. From the selection above, you will see that Security Audit has some events already selected.

image

I want to be more specific however. I unchecked the Audit Login  and Audit Logoff events and instead chose Audit Login Failed. This chose all the standard columns but won’t give us all the information we need. For that, I selected Show all Columns.

image

To troubleshoot I then chose NTUserName, SPID (can’t uncheck that one), ApplicationName, DatabaseName, and Error.

image

I then clicked Run to start tracing the events. Because this event only triggers once a minute, I only had to wait a short time to see the error captured. As you can see, it was the Report Server (Reporting Services Service) accessing the master database. You can also see that we have the matching 18456 event number.

SQL Server Profiler trace output

With that I had the information needed to take back to the client and inquire more as to why this service might have had access removed (not being defined in SQL security), be misconfigured (changed from a specific login to Network Service as in maybe it was recently added as a feature but misconfigured), or if there was some other explanation.

In this case, it turns out that the engineer troubleshooting an earlier problem wasn’t aware as to the state of the services and set SQL Reporting Services and SQL Integration Services from disabled to automatic and started them in an attempt to resolve a SQL problem that they were having. It didn’t solve their problem, but because they didn’t document their troubleshooting (or perform proper analysis as like above) they left those services running and in a state that caused additional work to troubleshoot and resolve.

While this is a very specific incident and resolution, I hope that this quick view into the SQL Server Profiler gives you an additional tool to properly research errors and resolve your problems. For additional information on the tool, please explore this MSDN link : http://msdn.microsoft.com/en-us/library/ms181091.aspx

Jason Condo, MCITP
Principal Consultant, Systems Management and Operations

Windows Server 2012 Beta Essentials Post 2

[Also see PART 1, PART 3]

In my previous post, I explained the installation process I went through to test Windows Server 2012 Beta (Release Candidate it calls itself) Essentials, as well as some of the reasoning behind the installation. In this post, I’m going to take you through the resulting server a bit. In a later post I’ll take you through the client view.

As a warning, this is yet another very long post. So buckle up, recline your seat, and get your snack box ready.

First things first. Between that post and this one, I had shut down the server, so this was a chance to see the boot experience. Remember that the server did NOT configure itself as a DHCP server, so when it came up it picked up an IP address from the network, which in this case was a new network from last time. That’s a fairly unusual situation – in real life that’s not going to happen very often but it will occasionally. For example, when a consumer-grade router is replaced, especially with one from a different vendor, it’s likely to have a different IP configuration for the LAN, so devices are going to change around a bit. Luckily, the server seemed to handle that okay, for now.

However, since I’m talking about IP addressing, after logging in, let’s look at the IP configuration:

IPConfig - Local DNS

Notice that DNS is set to point at itself, and the primary DNS suffix is now “BLOGDEMO.local“. This is reasonable – the server became a domain controller as part of the installation, and set its DNS name to be the same as the NetBIOS name that I gave it plus “.local“. That is a common-enough configuration and is a fair default. Like most DCs it is a DNS server, and that DNS server has the normal DNS records for a DC:

DNS zone blogdemo.local

So all of this is what I would expect to see. What I did not expect is what I did not see – it occurred to me at this point that Server Manager did not come up as it would normally on a Server 2012 machine. So that’s interesting – but then what should I use? Well, the Dashboard of course, conceptually carried forward from the WHS and EBS product predecessors. One interesting point to make before I continue is that Windows Home Server 2011/Essentials Business Server 2011 Dashboard add-ins are supposed to work on the new product. I have not had time to test this yet, partially because I don’t have too many add-ins on my home server (I know, weak sauce). That said, I’ll just repeat the Microsoft statement and go on.

How do I get to the Dashboard? Well, there’s a desktop shortcut right under the Recycle Bin on an otherwise clean desktop, and it’s pinned to the task bar as the first icon followed by PowerShell and Windows Explorer:

Dashboard on Desktop Pinned Dashboard

Fun fact: Microsoft won’t let a server product ship without PowerShell support. Old-timers will remember that there was a time that WMI support was a tollgate… so just like how it used to be that knowing VBScript and WMI was what separated the senior administrators from the junior administrators, now PowerShell does, although of course there are plenty of products (I’m looking at you, Exchange and Lync) where there’s a lot that can only be done through PowerShell, and not through the GUI at all, so it’s almost a “separate the junior administrators from the out of a job administrators” thing to now PowerShell now…

But enough about that. Back to the issue at hand. Let’s launch that Dashboard bad boy and see what we get.

We get, first, a generic server splash screen – slightly disappointing, but it fits with the new Microsoft model of “there’s only one product with variations” theme instead of “there’s dozens of SKUs, good luck! [muhahahahahahaha]”:It's Windows Server 2012!

Approximately 90 minutes later (ha ha, I kid!) I was presented with the new Metro Dashboard:

Metro Dashboard

Uh oh, there’s a scary icon in the corner with a “2”. I bet there’s two alerts! Let’s see:
Server Alerts

Well now that looks familiar! One of the scary alerts is “you must activate,” which is true.. so let’s click the task link and see how that goes:

Windows Activation Screen

Activating...

Uh oh:

image

Say what?!? Maybe DNS is broken:

DNS Failure

Yup. I wonder if DNS was configured to use the OLD DNS entries it picked up from DHCP when I first set it up as forwarders:

DNS Forwarders

<p class="commercial">Yes, I really did guess that right away. I’m that good. For the record so is the rest of Advanced Infrastructure at BA so feel free to hire us to help with your server needs.</p>

Interestingly the server should have realized that we can’t get to the forwarders and still worked, but it didn’t. Anyway, I removed those forwarders so that changing IPs wouldn’t burn me moving forward, but now, it’s time for me to get ready for my flight to Seattle. So I’m going to ignore that issue and move on for now. I’ll come back to it later, I promise.

Da plane boss!  Da plane! OK, I’m back, this time on the flight. United Channel 9 was keeping my ears occupied so you know I’m telling the truth. So let’s pick up where we were. First I need to make sure we have an IP address, so I set up a router VM and a private LAN for the lab. The details aren’t important, I just mention it to make it clear that this will stabilize the network configuration for the duration and to point out that private network support is one of the (few) areas that VMware currently does better than Hyper-V (one of the few as of Hyper-V 3.0). Now back to the regularly scheduled server investigation.

Twenty-two paragraphs of useless noise ago, I had the alert screen up. So let’s see what else we have on the list:

  1. Backups are not set up yet on the server. That’s true.
  2. Server folders are on the system drive. Also true, mainly because that’s the only drive. Guess I should fix that.
  3. Multiple services aren’t running – hmm, might be timing and network.
  4. Microsoft Update is not enabled. True.

So I re-evaluated the alerts, mainly so I could see if the services were up by now. There’s a refresh button on the top right of the list area that re-evaluates the alerts, just like the previous release. The services still weren’t up, so I clicked “Try to repair the issue” and it seemed happy. A quick check of services.msc confirmed all Automatic and Automatic (Delayed) services were now running, so we’re good there.

Next was to add drives to fix the backup and server folder location complaints. So, I figured, two drives, one for the server folders, one for the backups. So I shut down the VM (Windows+C, Power, Shut Down or Control-Alt-End, Power, Shut Down), added a SCSI controller, and added two drives. I brought the server up – hey, this is great, it’s a chance to see how the server responds to new storage, and that’s with an information alert (again, like earlier versions):

Unformatted hard drives are connected!

So it’s time to “Format and configure the hard drive“:

Choose one of the hard drives

Notice the server already had the drivers for the Hyper-V Synthetic SCSI card, which it should. So that worked right.

I picked the first drive, and decided it would be the backup drive. In real life you’re more likely going to have an external drive or small drive array for this so you can easily take it with you.

Configure hard drive usage

This brings up a dialog yet again familiar as Server Backup tries to get the lay of the land:

Loading data

Then it’s time to configure backup:

Getting Started

Select the Backup Destination

An odd dialog considering the disk is empty and it knows its empty:

Format warning

Label the destination drives

Specify the backup schedule

Select which items to back up

Confirm the backup settings

Setting up Server Backup

Success!

I could then click the same Alert Viewer link to configure the other drive:

Choose one of the hard drives
Format it Formatting... Success again!

OK, so now it’s time to use that new drive. I picked the alert complaining about having server folders on the system drive:
More alerts

No nice link to solve the problem there (why not?) so it’s time to manually go to the right screen, starting by closing the Alert Viewer.

Now I have a choice – I can continue the setup given in the start page for the Dashboard or do the storage. Because I’m going down a road I’ll keep going down it and switch to Storage:

image

Time to move each folder in turn:

Move the folder

Move a Folder

Calculating...

Choose a new location

Moving the folder

Moving the folder

Again, success!

OK, now it’s moved, but we need to make sure it’s backed up from the new location. Luckily the wizard prompts me to remember that. I actually waited until I had moved all of them and then just set it up at this page after the last one as otherwise I’m just repeating myself.

Server Backup Getting Started

Configuration options

Select Destination

<exact same screens for labeling the drive and scheduling backups>

Note Users came up selected as it was the last one moved, but I could select the previously moved ones, which is what I wanted to do and did:

Selecting folders to back up

Confirming backup settings

<same setup and confirmation screens as before>

More success!  It's going to go to my head!

Green is good! But if you pay attention when doing this you’ll see that just like in the previous release, the checkmark shows up as soon as you hit the Open button. This wizard doesn’t care if you actually set up backup, just that you acknowledged it’s existence. It’s like a small child with a short memory.

So let’s see the Alert Viewer now:

Only two more alerts to go!

That’s the best I could do without an Internet connection I thought, so I went back to the Home view in the Dashboard and saw what remained to check off:

Remaining tasks

Out of curiosity I checked the Microsoft Update setting – in the past you had to go to a web site to turn this on, but let’s see if that’s changed:

Microsoft Update view

Microsoft Update Dialog

YAY!  Thanks, whatever PM made this decision – the web site redirect out and back thing always struck me as at best a hack, so I’m glad that’s fixed.

Next is to add some users:

Adding users...

A user account

Oh, there’s those goofy checkmarks that I hated before. Yes, they look like the three entries towards the bottom are checked, but they aren’t – they turn green when on. This has always struck me as supremely confusing for some reason. Maybe it’s just me.

Anyway, what if I am a lazy administrator who hates security and just wants things to be easy for users?  Well, there’s a link there to “Change the password policy“:

Password policy

For now I left this alone and cancelled out of there.

I did the rest of the dialog – notice the default username was first name followed by last name and the green checkmarks I mentioned before:

Finishing adding a user

Yes I’m an administrator. I’ll make a peon in a moment.

Next are two screens confirming that as an administrator I am a god [muhahaha] or at least a demigod:

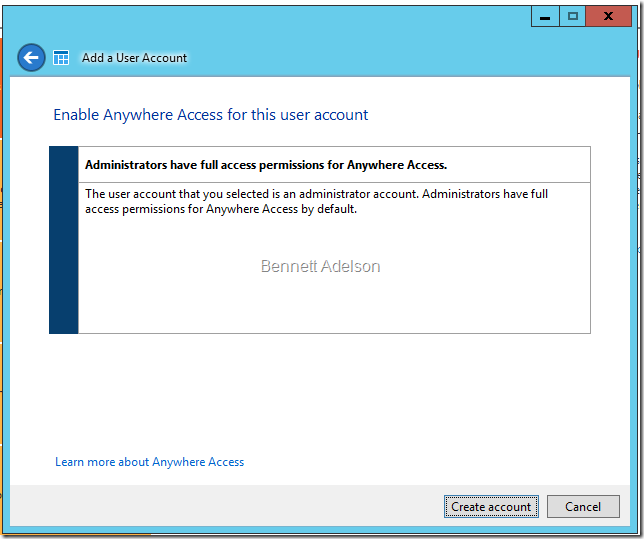
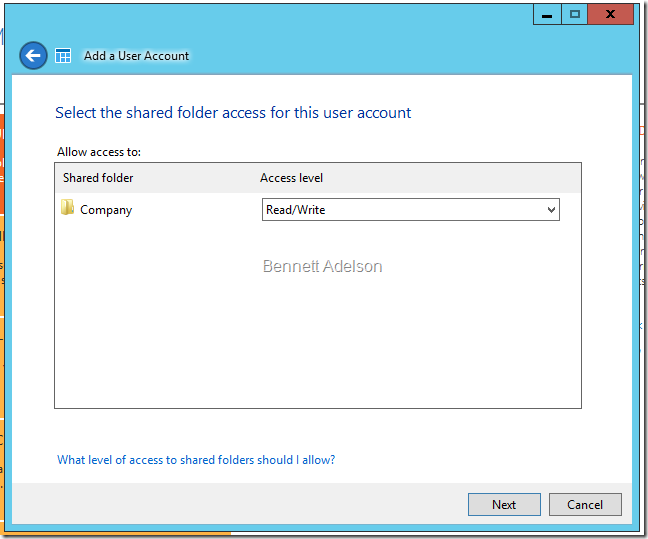
Shared folder access Anywhere access

After a brief creation screen I failed to screenshot (it’s not that exciting, it looks like all of the other progress dialogs, I promise), I have a confirmation that I have an account:

Success!

There’s a link I could use in case I forgot the password I just set, which is actually in a way nice, but I couldn’t use it as it requires an online connection to go to a help web site:

Online help link

Since I was still on the plane I let this go. Moving on…

I next added a standard user:

Standard User

Now I could set security for shared folders since standard user accounts are not automatically able to get to everything – the default was Read only but I changed it as Jarrod is my boss and I didn’t want to get fired. Making him a standard user is pushing my luck as it is 😉

Shared folder access

I will also allow Anywhere Access (note the VPN option – that’s new for a WHS replacement but not for an EBS replacement):

Anywhere Access

So enough of that, let’s go through the next step, adding more Server Folders. I’m going to add Audiobooks because I have that on WHS today at home:

Add server folders Name and description Level of access

The progress dialog and completion dialog (prompting for Server Backup) are exactly the same as moving a folder, which is somewhat reasonable. I won’t show them here as this post is already very long and it’s not new information.

At this point, I’m back off the plane. This post is taking many days to create! Anyway, that means for Anywhere Access I can try to get it to happen.

So next is what is now called Anywhere Access. It was hinted at before when setting up a user:

Set up Anywhere Access Set up Anywhere Access welcome

In my case I skipped the automatic router setup but a home or small business user will likely be able to use UPnP here. I suspect it works as well as WHS 2011 which means it works as well as your router does with handling UPnP:

Getting started

So now it’s time for the domain name. In WHS 2011 you have “yourchoice.homeserver.com” automatically provided as a dynamic DNS service. Can I do that now?  Let’s see:

I want to set up a new domain name Searching for domain name providers

Then I selected a name from Microsoft, which is how the previous release worked if you chose to use it:
What kind of domain name?

I am then asked for a Windows Live account (uh oh – out of date name!) to associate with the domain name:
Live Account

This failed with a fairly useless error message.  So I’m skipping it for now. In fact I’m going to skip the e-mail configuration and media server configuration for now as well, because there’s way too much here already, and without an Internet connection those items don’t make sense. I won’t forget about them forever, I promise!  Another post will come with that in it, likely after we look (finally) at the view from a client and another server.

Michael C. Bazarewsky
Principal Consultant, Server and Security

Windows Server 2012 Beta Essentials Install Walkthrough

[Also see PART 2, PART 3]

I have been a fan of Windows Home Server since the 1.0 beta days, using it at home in a production fashion. I stuck with the platform into the Vail days (Windows Home Server 2011), even with the removal of Drive Extender, because the media components and remote access capabilities are very nice to have, although not ideal.

Here Lies Windows Home Server (courtesy Ars Technica)Last week, however, as part of a major alignment of server SKUs, Microsoft announced that Windows Home Server is now dead-end, as are both Small Business Server SKUs.

The replacement, such as it is, is Windows Server 2012 Beta Essentials. I say it that way because there’s a lot of stuff not there, especially if you are an SBS person. However, for BA’s customers, this is not an issue – the move to Office 365 is happening so rapidly that this won’t be an issue.

In any event, because I am a happy WHS user, I wanted to see what the replacement would be like. There’s an excellent series by Terry Walsh at wegotserved that makes a good case that you can use the Windows 8 client to fill the need, and ArsTechnica made a similar point in their “death of WHS” post (where I got the tombstone picture above). But I want to see what the “official” replacement looks like, so I decided to spin up Hyper-V on my Windows 8 Release Preview machine and play a little.

To start, you’re going to want a VM with at least 2 GB of memory and 160 GB of hard drive space. You also need to have a NIC, either legacy or Hyper-V synthetic, that has a working network connection. The official specs are on the download page and at least at some level, they aren’t lying. I didn’t do that, so let’s see what goes wrong before showing it work correctly so you can learn from my mistake.

I initially configured a VM with dynamic memory from 512 MB to 2 GB, an 80 GB hard drive, and no network connection. Let’s see what happened.

I started by booting off the DVD, which works automatically because I don’t have another OS so the standard DVD boot sector that Microsoft uses doesn’t ask if I want to boot of the DVD; it assumes I do, and it’s right.

Before the next screen there is a very quick loading screen, which is fast enough on my VM that I couldn’t get a screenshot – but it is a little different than the Windows 7 version of the same thing, so someone spent a little time on that at least. There are I’m sure other changes that are not as visible.

Moving on:

Initial Splash Screen

I included the Hyper-V chrome in the screenshot just to show that was really what I was using. You won’t really see it much from now on.

I next got the standard first Windows Server 2012 installation screen. I left the defaults as they are right for me.

Initial Setup Options

Is it just me, or is the lining up of the Windows Server 2012 banner with the drop-downs both right and wrong? It looks silly to not be centered but then it would look wrong relative to the dropdown placement. Don’t know if there’s a “right” answer here. Anyway, I next get the Install now and Repair your computer options. So far, if you’ve installed Vista, Server 2008, or later, nothing particularly odd here.

Install now

I then clicked the Install now button – yay! But no:

Oops, out of memory

I got this error:

Windows cannot open the required file D:\Sources\install.wim. Make sure all files required for installation are available, and restart the installation. Error code: 0x800705AA

What does this mean? Well, after some Bing searches I find that it is telling me that Setup is out of memory. It appears dynamic memory support is not in WinPE. Learn something new every day. It’s an edge case so I can’t be annoyed about it. We’ll just change the memory to be fixed at 2 GB and move on.

So I reset the VM, this time getting the standard boot sector prompt for booting from the DVD that we’ve all come to know and love since Windows NT 4.0:

Press any key to boot from CD or DVD.

I pressed a key and went back through setup again. This time I got a successful “Setup is starting“:

Setup is starting

And then get asked for the product key. The public download page has the shared key for all beta installs (it’s the same TechNet gives me – I checked).

There is a weird bug exposed if you try to copy and paste the key from the web page – somehow Setup gets confused about the dashes and ends up losing text box available length, so you can’t actually put the whole key in. If that happens you need to reboot and go through it again. So to save you the trouble, here’s the key without dashes, which you can copy and paste into the VM: M4YNKGV7CRGPDCP4KKJX2YPP2

Enter a product key

Next up is the license agreement. As I always say, I just accepted it, ignoring the “first born son” part because they almost never enforce that provision:

License Agreement

Oh, which type of installation? Well, since the hard drive is empty, this is seems very stupid. There’s only one right option – the second “Custom: Install Windows only (advanced)” option. Why isn’t Setup smart enough to see that no attached hard drive have anything on them so there’s nothing to Upgrade? Well, actually, there’s a good reason, as we’ll see. Anyway, I chose the desired option of Custom.

Which type of installation?

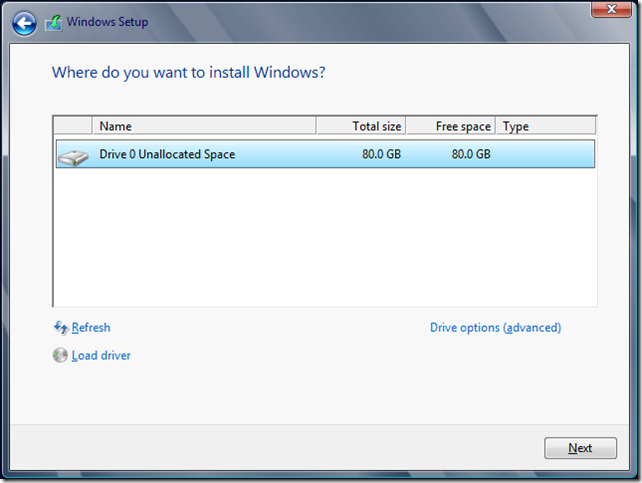
Where do I want to install Windows? On the single empty hard drive of course. This is why Upgrade makes sense on the previous screen, though – if I needed to load a storage driver to see my Windows installation, this is where I’d do it. So Setup has no way of knowing at the previous screen if there is an OS somewhere it just can’t see yet. Tricky tricky…

Where do you want to install Windows?

Then comes the setup status that is also essentially unchanged since Vista / Server 2008.

Installing Windows 1Installing Windows 2 Installing Windows 3 Installing Windows 4 Need to reboot

The first boot process does its stuff…

Preparing Getting devices ready Getting system ready Finalizing your settings

Then I was logged in automatically as Administrator:

Login

And finally the installation “continues”…

Installation continues

But uh oh, again not following directions burned me:

Some issue were found (sic)

Yes, this says 90 GB, when the requirements say 160 GB. Whatever. And yes, there is a grammar issue – “Some issue were found” indeed. I am very sad this screen was ever public which such an obvious issue. Some SDET or something somewhere needs to be slapped.

So I went through it all again, this time using a larger hard drive (120 GB). Once I made it past this part, I finally got to something fun.. Or not. Remember when I said I didn’t have a network connection?

Cannot find a network connection

Oops! Just to make sure that my Hyper-V synthetic card is visible to the OS, I used the old Shift-F10 standby to get a Command Prompt, then ran ipconfig to see the disconnected card:

ipconfig

So now it’s a question of connecting the card, running another ipconfig to make sure I now have an IP address, and hitting the Restart button. The OS went through a standard reboot, and an again automatically logged in (hey, it recovered!) with setup. Finally I seemed to be getting somewhere:

Verify the date and time settings

Screen clipping taken: 7/13/2012 10:34 AM

The time zone was Pacific Time by default (of course) so I hit “Change system date and time settings” and the standard dialog we all know and love (?) came up:

Date and Time Settings

I selected “Change time zone“, set the time zone appropriately, then pressed “OK“, “OK“, and then “Next“.

I now got a very interesting screen – “Clean install” or “Server migration“. In this case it’s clean but it’s clear that if you were moving from SBS you’d want to do a migration:

Installation mode

I may go back later and do a migration but at this point I wanted to see something – anything – installed so I did a clean installation. I next had identification information requested:

Identification information

Note that when I put in a company name a sane domain name was suggested. Also note that I was giving a NetBIOS domain name, not a DNS domain name, which is interesting. The server name was NOT set sanely, which is also interesting and a bit of a letdown after seeing a sane domain name selected.

Just for kicks I clicked the “What should I know before I personalize my server?” link and got a nice long page telling me that domain names can only be 15 simple characters etc. etc. which is right for a NetBIOS domain name:

What should I know before I personalize my server?

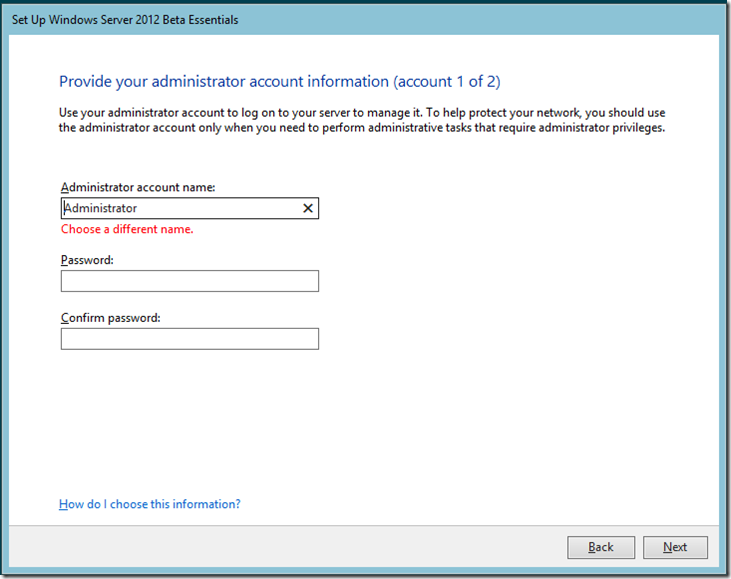
Also note the odd UI issue of black text on the dark title bar making the title unreadable. Again I expected better for the first public release. Small but obvious UI issues like this one and the grammar issue above significantly undermine confidence in the QA process and thus the product as a whole. Anyway, moving on… The next question is for the name of an administrator account. Of course I tried Administrator but that would be too easy – the default Administrator (SID 500) account is disabled automatically after installation (that information is in the help if you click “How do I choose this information?” although the help doesn’t explicitly say something like “Administrator is reserved and cannot be used.“) If you try to use it Setup yells at you:

Administrator account

So I picked something different:

AdminDude

Now it’s time for the peon… I mean standard user account:

Standard user account

Hey, it’s update configuration time! I used the recommended settings because I’m a good little admin:

Keep your server up-to-date automatically

Also note the bottom point – the feedback features are turned on by default in the beta just like the other 2012/Windows 8 beta releases. After that, it’s back to hurry up and wait:

Updating and preparing your server

Let me say at this point I would find the experience much more pleasant if the initial setup dialogs checked things like memory, network, hard drive space, and so on, and asked me the other questions, before they do. That would let the installer answer everything, click a button, and walk away, knowing it will all work. I was just installing Ubuntu the other day and was very annoyed that it kept stopping at seemingly random (of course not really) times to ask for yet more information and thought, “glad I don’t have to deal with that with a Windows Server”… surprise!.

After a while and at least one reboot (I admit I was not watching 100%), I started to log in again and this time, it was as my new administrator account in my new domain:

Login as new domain admin

And it’s ALIVE:

Server is now ready to be used

At this point, it’s time to connect a client, so I just spin up… oh… well, I have a Windows XP VM handy… oh, that’s no good according to the specs, and that one feels like a hard stop, so at this point I created a Windows 7 VM. It’s easy enough to do and I won’t bother going through details here as that’s not the point of this already very long post.

It was about this time however I realized that the server might be doing DHCP (uh oh!) so I checked… and it isn’t, which is actually the correct behavior. I don’t want it to, so yay for that. I suspect no one would want it to by default since you have working Internet somehow, presumably with a router handing out DHCP.

I think this is far enough for a single post. I’ll do later posts on the client connectivity and the dashboard experience very soon.

Michael C. Bazarewsky
Principal Consultant, Server and Security

Using UDP-SIP with Exchange UM and Lync 2010

Attachment: https://bennettadelson.wordpress.com/2012/06/04/using-udp-sip-with-exchange-um-and-lync-2010/kamailio-cfg/ (remember to change extension)

Attachment: asterisk.tar.gz (remember to change extension)

I am working on and off with a client that is deploying Exchange 2010 Unified Messaging and Lync 2010 in their environment. They want to use Exchange UM with a hosted SIP-based VoIP system from a provider that I will refer to as “PhoneCo” for the sake of discussion. Furthermore, they want their Lync environment to work with the Exchange voicemail, and by the way, think it would be nice if they could experiment with Enterprise Voice functionality. Luckily, PhoneCo offers SIP trunks, and will trunk from the hosted VoIP environment to Exchange UM. So all is good, right?

The Problem Statement

Ha ha, of course I am joking. Because although Microsoft talks SIP, and PhoneCo talks SIP, we hit upon a long-standing issue. Microsoft refuses to support UDP SIP (they have their reasons, I won’t debate the point here) while PhoneCo refuses to support TCP SIP. Thus, we have an impasse.

Solution Overview

The official, standard answer to this is to use a Session Border Controller (SBC), which is essentially a SIP middleman box that can do UDP on one end and TCP on the other. A typical SBC also includes firewalling intelligence to prevent denial-of-service and other such nasty behavior. As a result, they generally start at thousands and quickly get into tens of thousands of dollars. In this customer’s case, the SIP trunk is going to be over a private MPLS connection directly between the hosted PBX and the on-premises Microsoft tools, so the customer didn’t want to pay for a lot of security they didn’t need just to deal with this issue.

The customer found a commercial product named Brekeke SIP Server that appears to be $500 to start. This is nice in that (1) it is commercial and (2) it can run on Windows, although it is Java-based so it’s a little messy and gives you one more thing to deal with patching every day or two.

We wanted to see if there was an open-source way to solve this problem. We found a way, and this post documented what we came up with. I have replicated the scenario in a lab, and have since actually simplified things a bit. I have also corrected something we had done to work around an Asterisk “bug” (in quotes because the bug states it’s not really an Asterisk bug) that came up while we were simulating the PhoneCo setup.

So first, here’s the list of VMs that are in the UC Lab:

Hostname IP Description
dc.uclab.local 172.30.1.10 Domain Controller
exchange.uclab.local 172.30.1.12 Exchange 2010
freepbx.uclab.local 172.30.1.11 PhoneCo stand-in
lync.uclab.local 172.30.1.13 Lync 2010
siprouter.uclab.local 172.30.1.14 SIP middleman
tmg.uclab.local 172.30.1.1 TMG 2010
internalclient.uclab.local 172.30.1.100 Test Lync/SIP client

The PhoneCo stand-in is a FreePBX installation using the FreePBX Linux distribution. I am not going to go into details on installing that into a VM because there are plenty of guides on getting that to work. For the purposes of this post I’m going to pretend Asterisk can’t do TCP SIP because that’s what we are looking at with PhoneCo. This also means ignoring all the online info about getting Asterisk to talk to Lync and Exchange using TCP SIP. (Note: Some of these guides assuming port 5065 for talking to Exchange, which is a partial solution. I’ll get into why that’s wrong later on.)

The SIP middleman – SIP router – is a Linux-based CentOS machine running the Kamailio open-source SIP router package. Kamailio is a mature, solid package that is quite amazing in some of what it can do, but I’m ignoring about 99% of it, I think. We may end up needing some of the NAT support eventually at the client, which I’m not getting into here and don’t need for the lab, but otherwise a lot of functionality is actually not in play here.

Preparing the CentOS Machine

So let’s get to it.

  1. I began with a basic minimal CentOS 6.2 installation. Note that I’ve had repeated issues with the Hyper-V Integration Components on this OS so far, so I didn’t bother with them – for a lab it’s not critical. For production you’d care a lot more – the customer uses VMware so this particular issue did not come up.
  2. Next, I logged in as root via SSH (PuTTY is your friend here) and accepted the key when prompted:
    image
    image
  3. I ran yum updateto get all of the current updates for the OS, and rebooted to get the updated kernel loaded.
  4. Using vi, I created /etc/yum.repos.d/kamailio.repowith:
    [kamailio]
    name=Kamailio
    baseurl=http://download.opensuse.org/repositories/home:/kamailio:/telephony/CentOS_CentOS-6/
    enabled=1
    gpgcheck=0

    This looks like this:

    clip_image001

  5. I confirmed that the new repository was visible with yum repolist:clip_image002
  6. I then confirmed that there was a package I could install in that repository with yum list kamailio:
    clip_image003
  7. After confirming the package, I installed it with yum install kamailio:
    clip_image004

    clip_image005
  8. So now I need to configure the beast. Kamailio comes with a very long sample configuration file. Most of it is noise for my use. I tried to trim it down as safely as possible, as well as better fit what I wanted. So using the following commands I saved the shipped file:
    cd /etc/kamailio
    mv kamailio.cfg kamailio.cfg.original
    vi /etc/kamailio.cfg

    And then made mine, which I will explain later after finishing the build instructions:

    #!KAMAILIO
    
    # Remote Hosts
    #!subst "/SIP_UDP_HOST/172.30.1.11/"
    #!subst "/EXCHANGE_UM/172.30.1.12/"
    #!subst "/LYNC_MEDIATION/172.30.1.13/"
    
    listen=172.30.1.14:5060
    listen=172.30.1.14:5065
    listen=172.30.1.14:5067
    
    ####### Global Parameters #########
    
    memdbg=5
    memlog=5
    
    debug=2
    
    log_facility=LOG_LOCAL0
    
    fork=yes
    children=4
    
    disable_tcp=no
    
    auto_aliases=no
    
    /* uncomment and configure the following line if you want Kamailio to
       bind on a specific interface/port/proto (default bind on all available) */
    #listen=udp:10.0.0.10:5060
    
    # life time of TCP connection when there is no traffic
    # - a bit higher than registration expires to cope with UA behind NAT
    tcp_connection_lifetime=3605
    
    ####### Modules Section ########
    
    mpath="/usr/lib/kamailio/modules_k/:/usr/lib/kamailio/modules/"
    
    loadmodule "kex.so"
    loadmodule "tm.so"
    loadmodule "tmx.so"
    loadmodule "sl.so"
    loadmodule "pv.so"
    loadmodule "maxfwd.so"
    loadmodule "usrloc.so"
    loadmodule "textops.so"
    loadmodule "siputils.so"
    loadmodule "xlog.so"
    loadmodule "sanity.so"
    loadmodule "ctl.so"
    loadmodule "cfg_rpc.so"
    loadmodule "mi_rpc.so"
    
    # ----- tm params -----
    # auto-discard branches from previous serial forking leg
    modparam("tm", "failure_reply_mode", 3)
    # default retransmission timeout: 30sec
    modparam("tm", "fr_timer", 30000)
    # default invite retransmission timeout after 1xx: 120sec
    modparam("tm", "fr_inv_timer", 120000)
    
    server_header="Server: PhoneCo Intransigence Coping Solution (PICS) 2.0";
    
    ####### Routing Logic ########
    route {
            if(is_method("OPTIONS")) {
                    xlog("L_INFO","OPTIONS from $si");
                    sl_send_reply("200", "Yes, Microsoft, I am alive");
                    exit();
            }
    
            xlog("L_INFO", "*** M=$rm RURI=$ru F=$fu T=$tu IP=$si ID=$ci");
    
            # Route Exchange extensions
            if((to_uri=~"sip:5992") || (to_uri=~"sip:5999")) {
                    xlog("L_NOTICE", "EXCHANGE UM call, $proto port $op, $ru, $fU");
                    t_on_reply("1");
    
                    # https://issues.asterisk.org/jira/browse/ASTERISK-16862
                    # http://imaucblog.com/archive/2009/10/03/part-1-how-to-integrate-exchange-2010-or-2007-with-trixbox-2-8/
                    replace("Diversion: <sip:5999@SIP_UDP_HOST>;reason=unconditional","MCB-Stripped-Header: Diversion");
    
                    switch($op) {
                            case 5060:
                                    xlog("L_NOTICE", "Redirecting to TCP 5060");
                                    t_relay_to("tcp:EXCHANGE_UM:5060");
                                    exit();
                                    break;
                            case 5065:
                                    xlog("L_NOTICE", "Redirecting to TCP 5065");
                                    t_relay_to("tcp:EXCHANGE_UM:5065");
                                    exit();
                                    break;
                            case 5067:
                                    xlog("L_NOTICE", "Redirecting to TCP 5067");
                                    t_relay_to("tcp:EXCHANGE_UM:5067");
                                    exit();
                                    break;
                    }
            }
    
            # Route Lync extensions
            if(to_uri=~"sip:5...") {
                    replace("To: <sip:", "To: <sip:+");
                    xlog("L_NOTICE", "LYNC call to $tu");
                    t_relay_to("tcp:LYNC_MEDIATION:5068");
                    exit();
            }
    
            # Route the rest to Asterisk
            xlog("L_NOTICE", "Asterisk call to $tu");
            forward_udp("SIP_UDP_HOST", 5060);
    }
    
    onreply_route[1] {
            xlog("L_NOTICE", "Handling reply from Exchange relay, status $rs");
            switch($rs) {
                    case 302:
                            xlog("L_NOTICE", "Saw 302 Redirect response, checking details...");
                            if(search(";transport=Tcp")) {
                                    xlog("L_NOTICE", "Saw TCP redirection, changing redirection to UDP");
                                    replace(";transport=Tcp", ";transport=Udp");
                            } else {
                                    xlog("L_NOTICE", "302 was not matched (!)");
                            }
                            exit();
                            break;
                    case 100:
                            xlog("L_NOTICE", "Saw 100, leaving alone...");
                            exit();
                            break;
            }
    
    }


  9. I stared the daemon (read: service) with /etc/rc.d/init.d/kamailio start and confirmed that it started  with /etc/rc.d/init.d/kamailio status:clip_image001
  10. I confirmed it was listening (netstat –an | grep 506):clip_image002
  11. I then opened up the firewall to allow those ports in (okay, thats a lie – I floundered a bit before remembering I had to do this) by editing /etc/sysconfig/iptables and adding after the --dport 22line:
    		-A INPUT -p tcp -m state --state NEW -m tcp --dport 5060 -j ACCEPT
    		-A INPUT -p tcp -m state --state NEW -m tcp --dport 5065 -j ACCEPT
    		-A INPUT -p tcp -m state --state NEW -m tcp --dport 5067 -j ACCEPT
    		-A INPUT -p udp -m state --state NEW -m udp --dport 5060 -j ACCEPT
    		-A INPUT -p udp -m state --state NEW -m udp --dport 5065 -j ACCEPT
    		-A INPUT -p udp -m state --state NEW -m udp --dport 5067 -j ACCEPT

    This looks like this when it’s done:
    image

  12. I then made this kick in by restarting the firewall with /etc/rc.d/init.d/iptables restart.
  13. I next added system logger support for the configured log source by editing /etc/rsyslog.confand adding:
    local0.*                                                 /var/log/kamailio.log

    image

  14. I then made this kick in by reloading the logger configuration with /etc/rc.d/init.d/syslog reload.
    image
  15. I don’t want this log to grow uncontrollably so I configured the logrotate daemon to make a new log every day and save seven of them by creating /etc/logrotate.d/kamailiowith:
    /var/log/kamailio.log {
    	rotate 7
    	missingok
    	daily
    }

    image

Preparing Exchange 2010 and Lync 2010

This is normal Exchange and Lync SIP configuration so I’m not going to get into great detail here. The following are the key points:

  • Make sure Lync has a TCP listener on port 5068 on the mediation server of your choice. There’s no high availability here so pick one and go. As quick hints of where this is done in Topology Builder:
    clip_image001[7]
    clip_image002[8]
    After publishing and running Bootstrapper (Lync Setup) on the Mediation Server as instructed by Topology Builder I ran into (what I consider to be) a bug in Lync shown via the event log – there were LS Mediation Server messages 25075 and 25031 indicating no TCP port is enabled, then that the TCP port was requested but ignored. Restarting the Mediation Server service sorted it out. The Kamailio log will show this working (e. g. tail /var/log/kamailio.log):
    image
  • For Exchange, make sure you have TCP enabled on the UM server (requires a service restart to kick in) and that you have an appropriate IP gateway and unsecured telephone extension dial plan configured against that gateway:
    clip_image001[9]
    clip_image002[10]

And that’s it!

So What Does the Configuration Mean?

OK, so what the heck does the configuration I gave you above mean?  Let’s go through it:

#!KAMAILIO

This is a signature for the configuration file.

# Remote Hosts

#!subst "/SIP_UDP_HOST/172.30.1.11/"
#!subst "/EXCHANGE_UM/172.30.1.12/"
#!subst "/LYNC_MEDIATION/172.30.1.13/" 

listen=172.30.1.14:5060
listen=172.30.1.14:5065
listen=172.30.1.14:5067

This is the super important customization part. The three subst lines replace all references to those text strings with the appropriate IP addresses, while the listen lines allow the router to accept traffic on its IP on three ports – 5060, 5065, and 5067. The latter two are because Exchange – for reasons known to Microsoft but not me – takes UM connections on port 5060 but then redirects them to 5065 or 5067. Remember how above I said that some sites use 5065 and that’s wrong?  That’s because they are assuming all redirects are to 5065, but Exchange might want 5067.

Anyway, the next lines are some configuration stuff that is from the default that I left alone mainly because either the settings were fine (e. g. the syslog facility used) or because I didn’t know the implications in changing them (e. g. the children process count); there’s also the enabling of TCP (normally disabled):

####### Global Parameters ######### 
memdbg=5

memlog=5 
debug=2
log_facility=LOG_LOCAL0 
fork=yes

children=4 
disable_tcp=no 
auto_aliases=no 

# life time of TCP connection when there is no traffic
# - a bit higher than registration expires to cope with UA behind NAT
tcp_connection_lifetime=3605

Next are the modules that I am loading. I know I need some of these for sure – there are others I don’t know about so I left well-enough alone and kept them there:

####### Modules Section ######## 
mpath="/usr/lib/kamailio/modules_k/:/usr/lib/kamailio/modules/" 
loadmodule "kex.so"
loadmodule "tm.so"
loadmodule "tmx.so"
loadmodule "sl.so"
loadmodule "pv.so"
loadmodule "maxfwd.so"
loadmodule "usrloc.so"
loadmodule "textops.so"
loadmodule "siputils.so"
loadmodule "xlog.so"
loadmodule "sanity.so"
loadmodule "ctl.so"
loadmodule "cfg_rpc.so"
loadmodule "mi_rpc.so" 

# ----- tm params -----
# auto-discard branches from previous serial forking leg
modparam("tm", "failure_reply_mode", 3)
# default retransmission timeout: 30sec
modparam("tm", "fr_timer", 30000)
# default invite retransmission timeout after 1xx: 120sec
modparam("tm", "fr_inv_timer", 120000)

The next line sets a server header seen in the SIP headers. It is a fun way to point out that PhoneCo was annoying me as well as to hide the actual software being used:

server_header="Server: PhoneCo Intransigence Coping Solution (PICS) 2.0"

Now comes the real meat. It starts the routing logic for incoming SIP calls looking for the OPTIONS call that Lync and Exchange make every nanosecond (approximately) to check to see if their SIP peers are alive. Hence the status text – the code is all that really matters:

####### Routing Logic ########

route {
        if(is_method("OPTIONS")) {
                xlog("L_INFO","OPTIONS from $si");
                sl_send_reply("200", "Yes, Microsoft, I am alive");
                exit();
        }

The next line just acts as a debugging log showing what came in:

        xlog("L_INFO", "*** M=$rm RURI=$ru F=$fu T=$tu IP=$si ID=$ci");

The dollar-sign pseudo-variables are documented here, should you care: http://www.kamailio.org/wiki/cookbooks/3.2.x/pseudovariables

Anyway, moving on, we have the Exchange routing. Looking at this now, I probably want the two extensions (one for the auto-attendant and one for subscriber access) to be substituted variables, but that will be 2.1 I guess:

# Route Exchange extensions
        if((to_uri=~"sip:5992") || (to_uri=~"sip:5999")) {
                xlog("L_NOTICE", "EXCHANGE UM call, $proto port $op, $ru, $fU");
                t_on_reply("1");

This basically says “if a SIP call is made to extension 5992 or extension 5999, then do this…” and starts by indicating that we are going to do a transactional SIP redirect that, when we see a reply, should go to reply handler “1“, which will come later. After that, we have:

        # https://issues.asterisk.org/jira/browse/ASTERISK-16862
        # http://imaucblog.com/archive/2009/10/03/part-1-how-to-integrate-exchange-2010-or-2007-with-trixbox-2-8/
        replace("Diversion: <sip:5999@SIP_UDP_HOST>;reason=unconditional","MCB-Stripped-Header: Diversion");

Why is this here? Basically, Asterisk does something we don’t want it to do on the Exchange redirect – adds an extra SIP Diversion header – and we want that extra header to go away. I need to replace it with something though, so I just made up a vendor header and used that. This is safe as SIP agents – like HTTP server and clients – ignore headers that they don’t know. Next, we take the UDP session and do a transactional redirect to TCP:

        switch($op) {
                case 5060:
                        xlog("L_NOTICE", "Redirecting to TCP 5060");
                        t_relay_to("tcp:EXCHANGE_UM:5060");
                        exit();
                        break;
                case 5065:
                        xlog("L_NOTICE", "Redirecting to TCP 5065");
                        t_relay_to("tcp:EXCHANGE_UM:5065");
                        exit();
                        break;
                case 5067:
                        xlog("L_NOTICE", "Redirecting to TCP 5067");
                        t_relay_to("tcp:EXCHANGE_UM:5067");
                        exit();
                        break;
                }
        }

I couldn’t come up with a “smart” way to do this better; this is a little wordy but it is clear what is happening. I next route the Lync calls (adding the E.164 “+” sign along the way) based on extension pattern (all other 5xxx extensions besides the two special case ones above), with all others going to the Asterisk side:

        # Route Lync extensions
        if(to_uri=~"sip:5...") {
                replace("To: <sip:", "To: <sip:+");
                xlog("L_NOTICE", "LYNC call to $tu");
                t_relay_to("tcp:LYNC_MEDIATION:5068");
                exit();
        }

        # Route the rest to Asterisk
        xlog("L_NOTICE", "Asterisk call to $tu");
        forward_udp("SIP_UDP_HOST", 5060);
}

Notice that I do forward_udpinstead of t_relay_to because I don’t care about maintaining transactional state in the case of going back to Asterisk, so there’s no reason to waste resources on it. I just tell Kamailio to throw it over the wall and forget about it.

Finally, I handle the reply from Exchange. This is why I made the Exchange piece transactional:

onreply_route[1] {
        xlog("L_NOTICE", "Handling reply from Exchange relay, status $rs");
        switch($rs) {
                case 302:
                        xlog("L_NOTICE", "Saw 302 Redirect response, checking details...");
                        if(search(";transport=Tcp")) {
                                xlog("L_NOTICE", "Saw TCP redirection, changing redirection to UDP");
                                replace(";transport=Tcp", ";transport=Udp");
                        } else {
                                xlog("L_NOTICE", "302 was not matched (!)");
                        }
                        exit();
                        break;
                case 100:
                        xlog("L_NOTICE", "Saw 100, leaving alone...");
                        exit();
                        break;
        }

Notice if I get a redirect from Exchange (which I will for port 5060) I change that from a Tcp redirect to a Udp redirect, then send it on its way.

So, this is what is in the lab right now. I think this works – until PhoneCo gets the line in place we won’t know 100% but I think this is close if it isn’t completely right. We’ll see.

Hope this helps you in your integration scenarios!

— Michael C. Bazarewsky
Principal Consultant, Windows Server and Security

System Center Configuration Manager RTM: A Lab Installation

Since System Center Configuration Manager has been released, I thought it might be helpful to provide a how-to guide on a lab install of System Center Configuration Manager.  For this lab environment we will install both a Central Administration Point, and a Primary Site.  The instructions assume are familiar with SCCM 2007 and its install.

So many of you may ask why I am installing a CAS for a lab environment.  For this lab I want to experience a full SCCM architecture.  This requires an additional machine (or VM) to host, and likely isn’t needed in all but extremely large environments, but will provide the ability to experience a large design implementation.

Lab Environment – Requirements

  1. A server (or virtual machine) running Server 2008 R2 SP1 for the Central Administration Site (CAS) install.  This will be named BACLEVSCCM12CAS.
  2. A server (or virtual machine) running Server 2008 R2 SP1 for the Primary Site install.  This will be named BACLEVSCCM12.
  3. SQL 2008 R2 Enterprise, SP1, and SP1 CU4.
  4. System Center Configuration Manager RTM media.

Setup – Active Directory

Your AD environment must give Full Control rights to the SCCM Servers to the System\Systems Management AD container.

Setup an AD account called SVC_SCCM which is a member of the Domain Admins Group.  All installs to the servers will use this account.  This is done as a best practice to ensure the SQL and SCCM install is not tied to an individual user.

Install the Central Administration Site on BACLEVSCCM12CAS

Setup – Install SQL on CAS

We will be using SQL Server 2008 R2 Enterprise, with SP1 and SP1 CU4 (not to be confused with the non-sp1 CU4) for our install.  The following options must be enabled in SQL during the install.

  1. Only the Database Engine Services feature is required for site server.
  2. Reporting Services (if you want to add this feature to SCCM, which you do)
  3. I am installing the Management tools so I can manage it locally however as well. Be sure to patch to SP1, and then apply the SP1 CU4 update.

Setup – Server 2008 R2 on CAS

I will be installing on a Server 2008 R2 SP1 system.  The following features (and roles that will be forced because of the features) must be enabled:

  1. .Net 3.5 SP1
  2. Background Intelligent Transfer Service (BITS) including Compact Server and IIS Server Extension
  3. Microsoft Remote Differential Compression
  4. IIS 6 WMI Management Compatibility – IIS 6 WMI compatibility

Setup – SCCM Assess Server Readiness on CAS

Login in as the SVC_SCCM account.

Launch Assess server readiness and ensure there are no errors.

image

As you can see we have some warnings, but can install.

image

Setup – SCCM Install CAS

  1. Launch Installimage
  2. Click Nextimage
  3. Choose to Install a Configuration Manager central administration siteimage
  4. Enter your key or run in evaluation mode.image
  5. If you accept the license terms, continue.image
  6. More license terms, if you accept continue.image
  7. Select a location to download the prerequisites and click next.  This will then download all the necessary files in multiple languages (just in case).  You will wait a while for this to finish.image
  8. Select your Language for the console and reports.image
  9. Select your client languages.image
  10. Setup your Site Code, Site Name, and Install Folder.  Ensure you install the console as well.image
  11. Setup the Database Information (The defaults are perfectly fine).image
  12. Verify the FQDN of the server.image
  13. Feel free to Join the Customer Experience Improvement Program.image
  14. Verify the Settings Summary and continue.image
  15. The prerequisite check will now run again (aren’t we glad we did this first to ensure we pass?)image
  16. The install will then run for a while.image
  17. Your Central Administration Site is now installed!

Install the Primary Site on BACLEVSCCM12

Setup – Install SQL on Primary

We will be using SQL Server 2008 R2 Enterprise, with SP1 and SP1 CU4 (not to be confused with the non-sp1 CU4) for our install.  The following options must be enabled in SQL during the install.

  1. Only the Database Engine Services feature is required for site server.
  2. Reporting Services (if you want to add this feature to SCCM, which you do)
  3. I am installing the Management tools so I can manage it locally however as well. Be sure to patch to SP1, and then apply the SP1 CU4 update.

Setup – Server 2008 R2 on Primary

I will be installing on a Server 2008 R2 SP1 system.  The following features (and roles that will be forced because of the features) must be enabled:

  1. .Net 3.5 SP1
  2. Background Intelligent Transfer Service (BITS) including Compact Server and IIS Server Extension
  3. Microsoft Remote Differential Compression
  4. IIS 6 WMI Management Compatibility – IIS 6 WMI compatibility

Setup – SCCM Assess Server Readiness on CAS

Login in as the SVC_SCCM account.

Launch Assess server readiness and ensure there are no errors.

image

As you can see we have some warnings, but can install.

image

Setup – SCCM Install CAS

  1. Launch Installimage
  2. Click Next image
  3. Choose to Install a Configuration Manager primary site (do not select Use typical installation options for a stand-alone primary site)image
  4. Enter your key or run in evaluation mode. image
  5. If you accept the license terms, continue. image
  6. More license terms, if you accept continue.image
  7. Select a location to download the prerequisites and click next (or point it at the files we downloaded on the previous install).  This will then download all the necessary files in multiple languages (just in case).  You will wait a while for this to finish.image
  8. Select your Language for the console and reports.image
  9. Select your client languages.image
  10. Setup your Site Code, Site Name, and Install Folder.  Ensure you install the console as well.image
  11. Enter the Central administration site server (FQDN).image
  12. Setup the Database Information (The defaults are perfectly fine).image
  13. Verify the FQDN of the server.image
  14. Choose Configure the communication method on each site system role and Clients will use HTTPS when they have a valid PKI certificate and HTTPS-enabled site roles are available.image
  15. Setup the management point and distribution point to use HTTP communicationimage
  16. Feel free to Join the Customer Experience Improvement Program.image
  17. Verify the Settings Summary and continue.image
  18. The prerequisite check will now run again (aren’t we glad we did this first to ensure we pass?)image
  19. The install will then run for a while.image
  20. Your Primary Site is now installed!

Future Activities

In future blog posts I will detail configuring the site for use, and migration from an existing SCCM 2007 environment.

David Norling-Christensen
Senior System Architect